Velociraptor is an excellent tool for digital forensics and incident response, and their docs already explain how to configure things in the cloud with Google domains. But what if you’re an Azure aficionado? That’s where this post comes in.
Key Learnings in this Post
- Installing Velociraptor on an Ubuntu VM (hosted in Azure).
- Securing the whole shebang (because the internet can be a scary place).
- Automating your VM’s start and deallocation times so you’re not crying over Azure bills.
- Connecting actual clients to the Velociraptor instance to see if everything truly works.
Creating the Virtual Network
Let’s begin by setting up our virtual playground (the virtual network or VNET). If you don’t already have a resource group, create one – think of it as a container that holds all your stuff. From there, open a Cloud Shell or follow along using the Azure GUI and make sure you’re using the correct Azure subscription if you have multiple (you might need Set-AzContext -Subscription ).
Run this command to create a shiny new subnet named default inside a virtual network called VelociraptorVNET:
az network vnet create \
--name VelociraptorVNET \
--resource-group \
--subnet-name default \
--location westeurope
When done, you’ll see JSON confirming that the VNET was created successfully. You can verify by visiting your resource group in the Azure portal. There should be a virtual network with a default subnet (10.0.0.0/24).

Hang onto that subnet ID. It’ll be useful once we create our VM and network interface card (NIC).
Setting up the VM
Next, we need to set up an Ubuntu VM. You can do it one-liner style:
az network nic create --resource-group --name VelociraptorNIC --subnet
az vm create --name VelociraptorVM --resource-group \
--image Ubuntu2204 \
--vnet-name VelociraptorVNET \
--subnet default \
--admin-username azureuser \
--nsg VelociraptorNSG \
--generate-ssh-keys
But maybe you want to see each step in the Azure GUI. If so, pick Ubuntu Server 24.04 LTS x64, give it 8 GB of memory and 2 CPUs, and you’re off to the races. It is recommended to use SSH public key authentication (the wizard generates a key pair for you if you don’t already have one). Set public inbound ports to None if you want to be extra cautious – since you can later fine-tune the rules in your brand-new network security group.
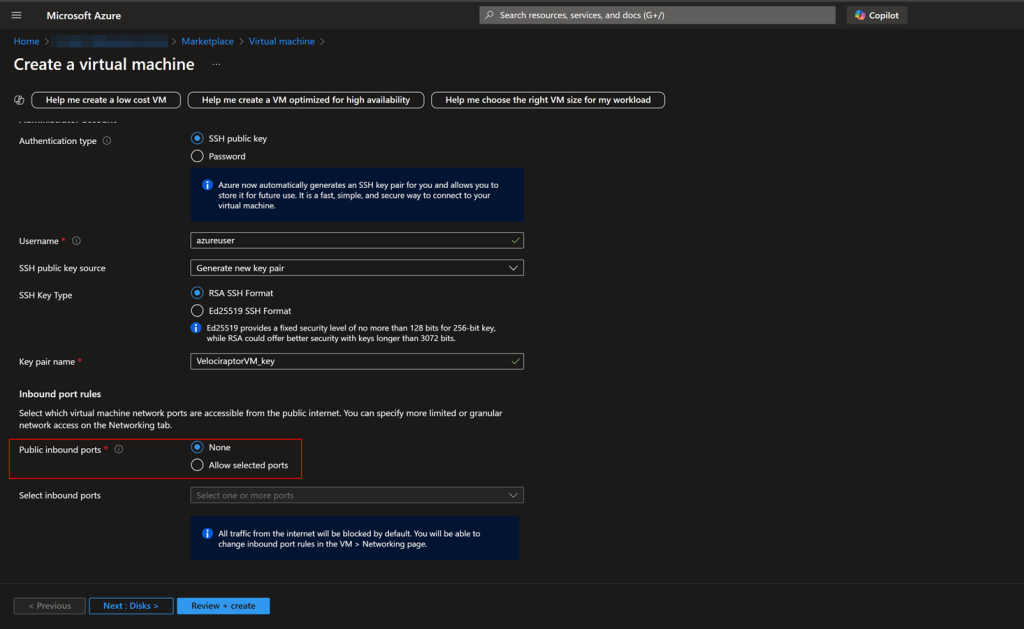
Disk size is up to you; 128 GB Standard SSD is a solid start. If your incident scope is big – or you’re planning to hoard logs – feel free to size up. Just remember, bigger disks mean bigger bills. Navigate to Networking and select the VNET and subnet you just created. Slap on a public IP, too, then create (or select) your NSG.
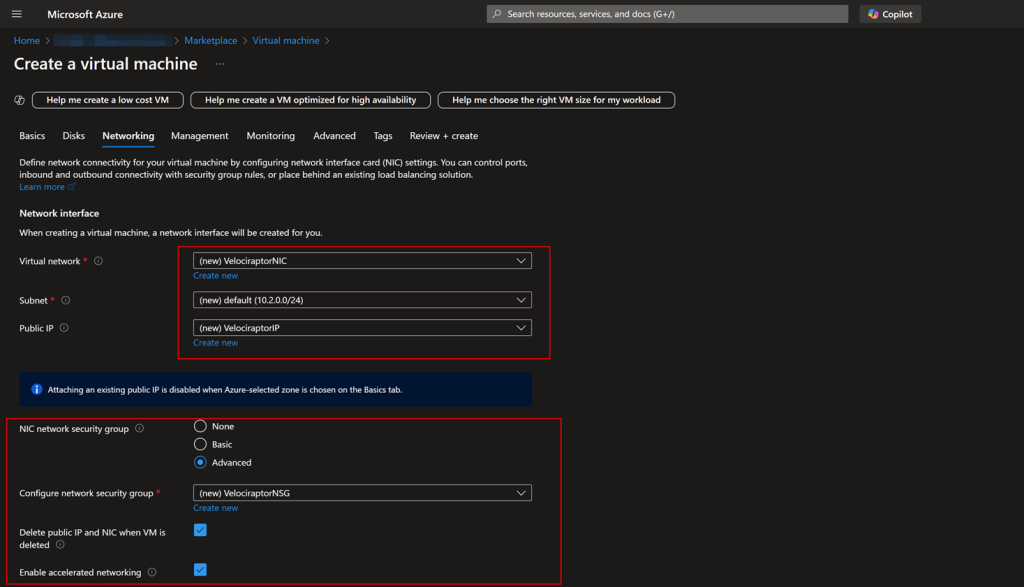
In the NSG, we’ll configure it to allow SSH only from a specific IP range. Later, we’ll open ports 80 and 443 to access the Velociraptor GUI and allow incoming client connections. Also, add a DNS name label (something like myvelociraptor.westeurope.cloudapp.azure.com) so you don’t have to memorize IP addresses. We need the domain later during the Velociraptor installation to issue a Let’s Encrypt certificate for this domain instead of a self-signed certificate.

Automating VM Start/Stop
Because we love saving cash, head over to the VM’s Automation section. Set up tasks that turn the machine on at 08:00 AM and off at 06:00 PM (or whenever you prefer). This way, you won’t be charged 24/7, and your IR environment can rest at night. Even if you have clients connected, they’ll attempt to reconnect once the VM is back online. Navigate to the Velociraptor VM > automation > Tasks and click Add task.

Create two tasks: one for deallocation and one for starting. Input your desired schedule and add your email for notifications. After creating both automation tasks, you should see two tasks in the task overview.
Backup Configuration
If you’d like, go a step further and configure Azure’s backup service. This is particularly helpful if you’re worried about losing access to connected Velociraptor clients or dealing with critical forensics data. See https://learn.microsoft.com/en-us/azure/backup/backup-overview for details. It can be as simple as setting daily or weekly backups – enough to keep your environment safe from meltdown or user error.
I will configure the VM to create a daily backup for demonstration purposes. To do this, navigate to the Velociraptor VM > Backup + Disaster Recovery > Backup. You will need to select a vault and you can either create a new one or select an existing one.

Next, you need to configure a backup policy. As mentioned earlier, I chose a daily backup at 06:00 UTC+1. Daily backups are kept for 30 days and any weekly backup created on Sunday will be kept for 12 weeks each.

SSH Passphrase
By default, password authentication is disabled when creating a keypair, see https://learn.microsoft.com/en-us/azure/virtual-machines/linux/mac-create-ssh-keys. However, as an additional layer of security (and as a best practice), we add a passphrase to the private SSH key of the user we have created. Since no passphrase has been added, we load the key into PuTTYgen first.

Import your private key, set a passphrase, and then export it again. Now you can SSH using your passphrase-protected key: ssh azureuser@<label>.northeurope.cloudapp.azure.com -i VelociraptorVM_key.pem
Ubuntu Hardening
When running a critical service like Velociraptor, it’s best not to leave your Ubuntu VM open to potential threats. Fortunately, there’s an excellent high-level checklist on the official Ubuntu blog that outlines various ways to reinforce your system’s defenses. Some of these measures might already be enabled by default – like Secure Boot and vTPM – depending on how you set up your VM. But even if they’re switched on, you can do more.

For instance, activating automatic security updates so your system regularly patches vulnerabilities. We’ll utilize the unattended-upgrades package in this scenario:
- Connect to your VM over SSH (e.g.,
ssh azureuser@systemName -i path/to/private.key). - Run sudo
apt-get install unattended-upgrades. - Use
sudo dpkg-reconfigure --priority=low unattended-upgradesorsudo dpkg-reconfigure -plow unattended-upgradesto configure how updates are applied. - Edit
/etc/apt/apt.conf.d/50unattended-upgradesif you only want security updates automatically installed. The relevant snippet looks something like this:
[truncated]
Unattended-Upgrade::Allowed-Origins {
"${distro_id}:${distro_codename}";                                                                                                                                                                                                           "${distro_id}:${distro_codename}-security";                                                                                                                                                                                                  // Extended Security Maintenance; doesn't necessarily exist for                                                                                                                                                                              // every release and this system may not have it installed, but if                                                                                                                                                                           // available, the policy for updates is such that unattended-upgrades                                                                                                                                                                        // should also install from here by default.                                                                                                                                                                                                 "${distro_id}ESMApps:${distro_codename}-apps-security";                                                                                                                                                                                      "${distro_id}ESM:${distro_codename}-infra-security";                                                                                                                                                                                 //      "${distro_id}:${distro_codename}-updates";                                                                                                                                                                                           //      "${distro_id}:${distro_codename}-proposed";                                                                                                                                                                                          //      "${distro_id}:${distro_codename}-backports";
};
[truncated]
Beyond these basics, you might also consider endpoint security solutions, advanced logging, and additional system-hardening strategies – whatever your threat model calls for. While this post doesn’t cover every possible security tweak, reviewing Ubuntu’s official security recommendations can help ensure your VM remains robust in the face of potential attacks. Regarding security updates, there is an Ubuntu blog post as well https://help.ubuntu.com/community/AutomaticSecurityUpdates.
Creating a “Clean” Restore Point
After a quick sudo apt-get update && sudo apt-get upgrade -y, it’s a good idea to create a restore point for this freshly configured VM. Go to the VM’s Backup & Disaster Recovery section, choose Restore point, and give it a descriptive name (maybe something like UbuntuCleanInstall_YYYYMMDD). If anything breaks down the line, you have a stable baseline to revert to.

Installing Velociraptor
Now that we have a clean Ubuntu installation – with a bit of security hardening sprinkled in – it’s time to install Velociraptor. Official docs are here if you need them: Velociraptor Deployment. Since we plan to use Let’s Encrypt for certificates, make sure ports 80 and 443 are allowed through your Network Security Group. The Velociraptor GUI also listens on port 443, so you’re covered there. If you ever want to use the API on port 8001, you’ll need to open that up as well.

I grabbed the version compiled for Ubuntu 22.04 (and later) from Velociraptor Downloads and transferred it to my VM with a quick scp -i VelociraptorVM_key.pem ./velociraptor-v0.73.3-linux-amd64 azureuser@<VelociraptorHostname>:/tmp.
Once it’s on your VM, make it executable: chmod +x velociraptor-v0.73.3-linux-amd64. From there, generate your server config by running: ./velociraptor-v0.73.3-linux-amd64 config generate -i. Make sure to specify the previously chosen DNS name.

This will generate a server.config.yaml as well as a client.config.yaml. When that’s done, we build a the package: ./velociraptor-v0.73.3-linux-amd64 --config server.config.yaml debian server. This should produce a file like velociraptor_server_0.73.3_amd64.deb. Install it using: sudo dpkg -i velociraptor_server_0.73.3_amd64.deb.

The service should be enabled by default.

So you can head over to https://<VelociraptorHostname> and log in with the credentials you specified. Remember that your configuration files contain cryptographic secrets, so store them securely. They also come in handy if you ever need to upgrade or migrate your Velociraptor instance.
Once you’re logged in and see that lovely Velociraptor UI, congratulations – you’re officially up and running!
Another Restore Point (Just in Case)
At this stage, you have a working Velociraptor instance. Consider creating another restore point in Azure. Label it something like VelociraptorInstall_YYYYMMDD. It’s a quick safety net if you upgrade Velociraptor, experiment with advanced hunts, or otherwise make big changes.
Testing the Installation: Adding a VM as a Velociraptor Client
Now that your Velociraptor server is up and running in Azure, it’s time to make sure everything actually works by connecting a client. We’ll take a virtual machine running in VMware and point it to your new Velociraptor instance for a quick test.
Open your Velociraptor web GUI and select Server Artifacts on the sidebar on the left side of the page.

From there, select New Collection, search for Server.Utils.CreateMSI, and choose that artifact.

When you’re set, click Launch, and Velociraptor will generate a shiny new MSI. Once it’s ready, you can download it directly by clicking on its filename.

Installing the MSI is straightforward. Just run: msiexec /i name_of_velociraptor.msi on the client you want to connect.

You’ll need elevated privileges – otherwise, the installer won’t be able to do its thing.
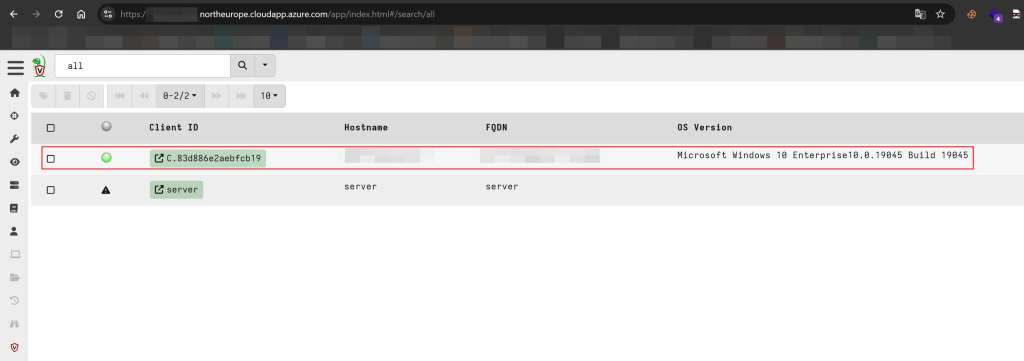
After installation, head back to the Velociraptor interface to check for connected clients. You can either click Show All or navigate directly to /app/index.html#/search/all. If everything’s working, your VM should appear in the list.
To confirm that the client is fully functional, choose the system from the list, navigate to its collected artifacts, and pick a simple artifact to collect – like Generic.System.Pstree.
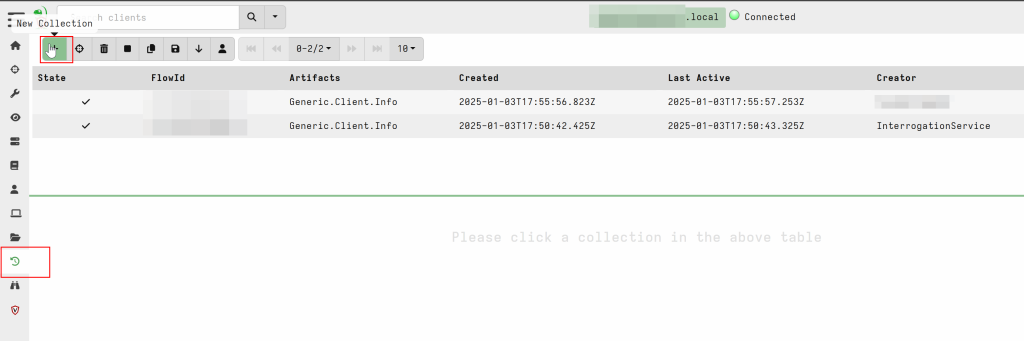
Click Launch and let it run. If it completes successfully, you’ll see the results in Velociraptor’s interface.

Congratulations – Your VM can officially talk to Velociraptor in Azure, and data is flowing back into your server without issues. Feel free to onboard more endpoints or start exploring Velociraptor’s powerful hunting and investigation features. Have fun!
