Although CrowdStrike is a powerful EDR, incidents still happen, even when using thorough prevention policies. In this post, we will use CrowdStrike Falcon in combination with Velociraptor to streamline our incident response processes. If you want to learn more about Velociraptor, check out their docs or one of our previous blog posts, in which we describe how to set up Velociraptor in Azure.
Key Learnings in this Post
In this blog post, we will showcase:
- How to use Falcon real-time response (RTR) to execute Velociraptor offline collector and connect to the Velociraptor server.
- How to use Velociraptor offline collector to collect artifacts and push the offline collection to Azure blob storage.
- How to automatically deploy Velociraptor in case of an incident using Fusion SOAR
Requirements
You’ll need access to CrowdStrike Falcon and have at least one system to connect to Falcon. Also, suppose you want to use Azure storage to upload the offline collection created by Velociraptor. In that case, you’ll need an Azure resource group as well as a Velociraptor server accessible by the client you want to connect to Velociraptor.
Preparation
Let’s start by setting up our lab scenario. We have created a little sketch to make things (hopefully) more precise. Ultimately, we want to have something like the following screenshot.

For demonstration purposes, we will have a single compromised / target host system, which, in our case, will run a Velociraptor offline collector whose output is either stored locally or uploaded to an Azure storage blob. And finally, in our last scenario, a Velociraptor agent will connect back to our Velociraptor server. We will also use an additional Windows 11 workstation to access the private endpoint for the Velociraptor storage.
Creating a Private Endpoint and Storage Account
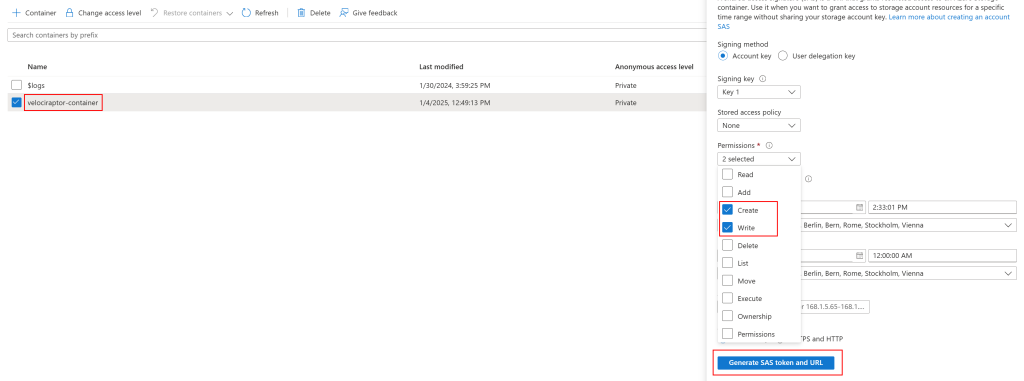
To prepare Azure Storage for Velociraptor, first create (or select) a storage account in your desired Azure resource group. If you do not have a dedicated container yet, create one and configure its permissions so that Velociraptor can create and write files. If possible, generate a user delegation key; however, in some cases (like the example here), you can rely on the storage account key. After creating the container, set an expiration date (if you wish), click “Generate SAS token and URL” and note the SAS URL. You will need it for the Velociraptor offline collector configuration.
Next, create a private endpoint for the storage account. Search for “private endpoint” in the Azure portal, create a new one, select “Connect to an Azure resource in my directory” and choose Microsoft.Storage/storageAccounts as the resource type, with “blob” for the sub-resource.
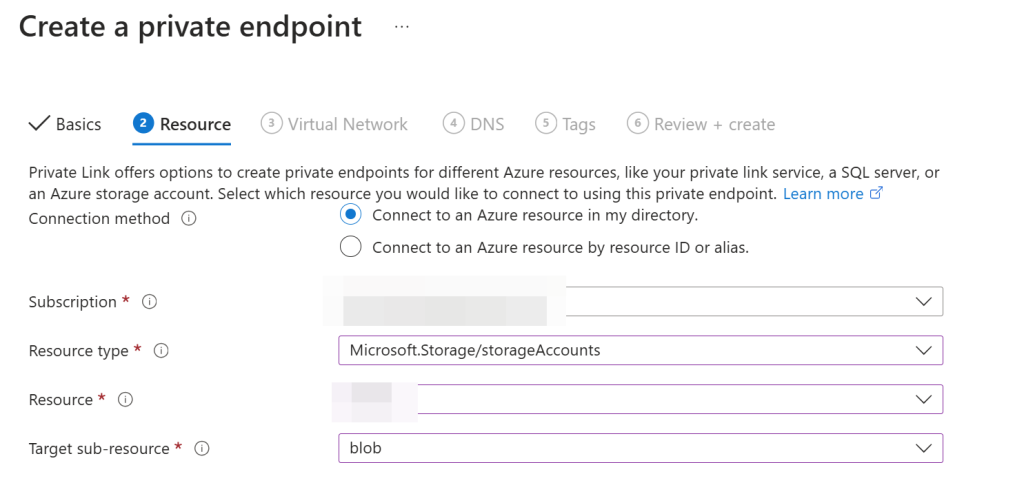
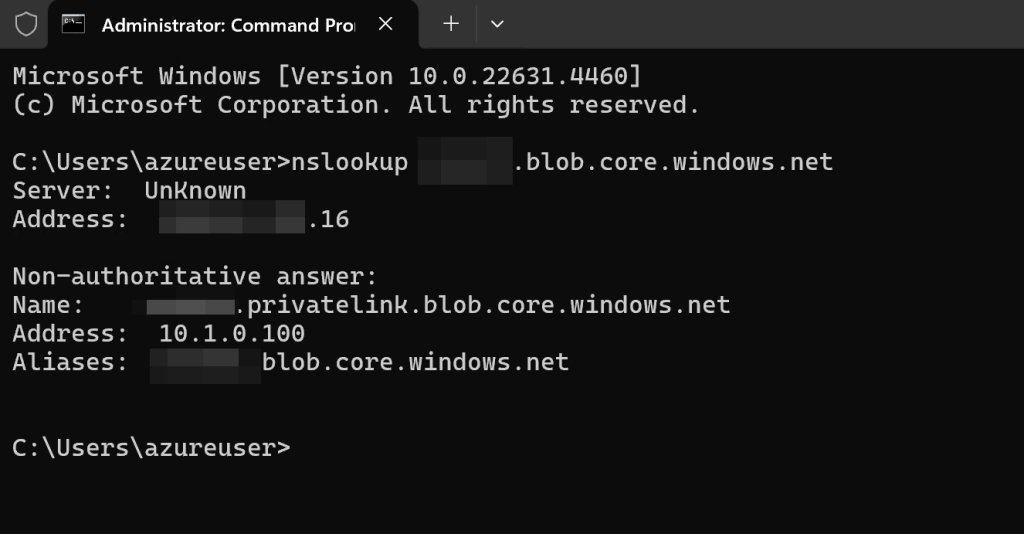
Assign it to the appropriate virtual network and subnet. You can choose a static IP if you want. In the DNS settings, it is usually fine to use the defaults. To check if the connectivity to the private endpoint works, we connected to the forensics machine and ran nslookup <endpoint>.blob.core.windows.net. Replace with the name of the storage account you created in the previous steps.
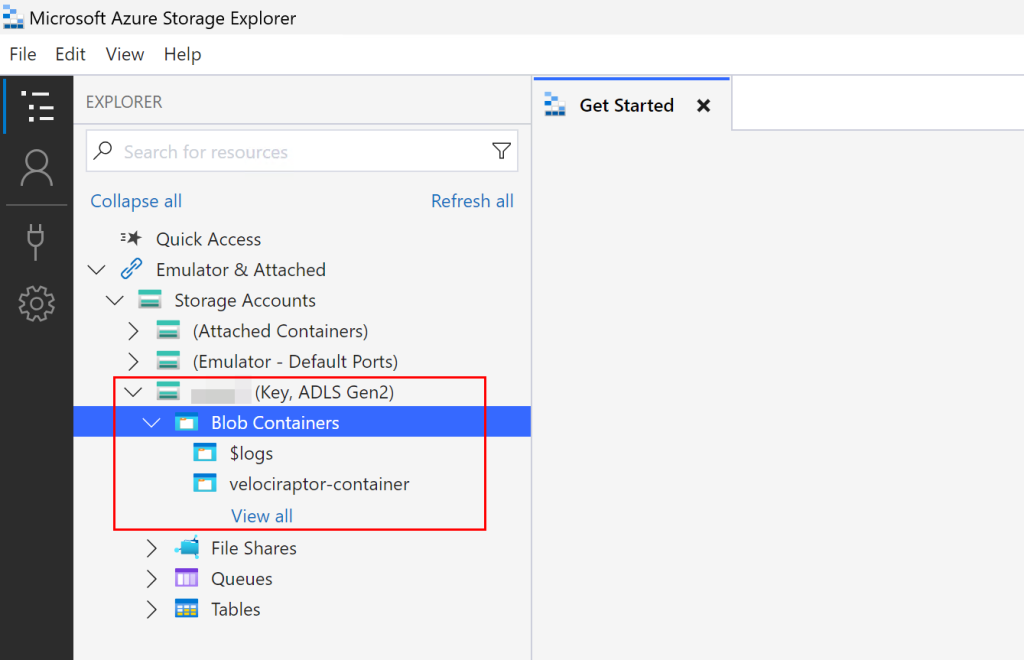
After configuring the private endpoint, you can test connectivity by installing Microsoft Azure Storage Explorer on the Windows 11 forensics machine (or on the Velociraptor server itself, if you prefer). Open Storage Explorer, click the power plug icon on the left toolbar to add a new resource, choose “storage account or service”, pick “Connection string” and paste in the connection string you copied from the Azure storage account access keys. This should give you direct access to your storage account and the container you created for Velociraptor data.
With that completed, you have everything in place to store offline collector results in Azure.
Preparing our Velociraptor Binaries
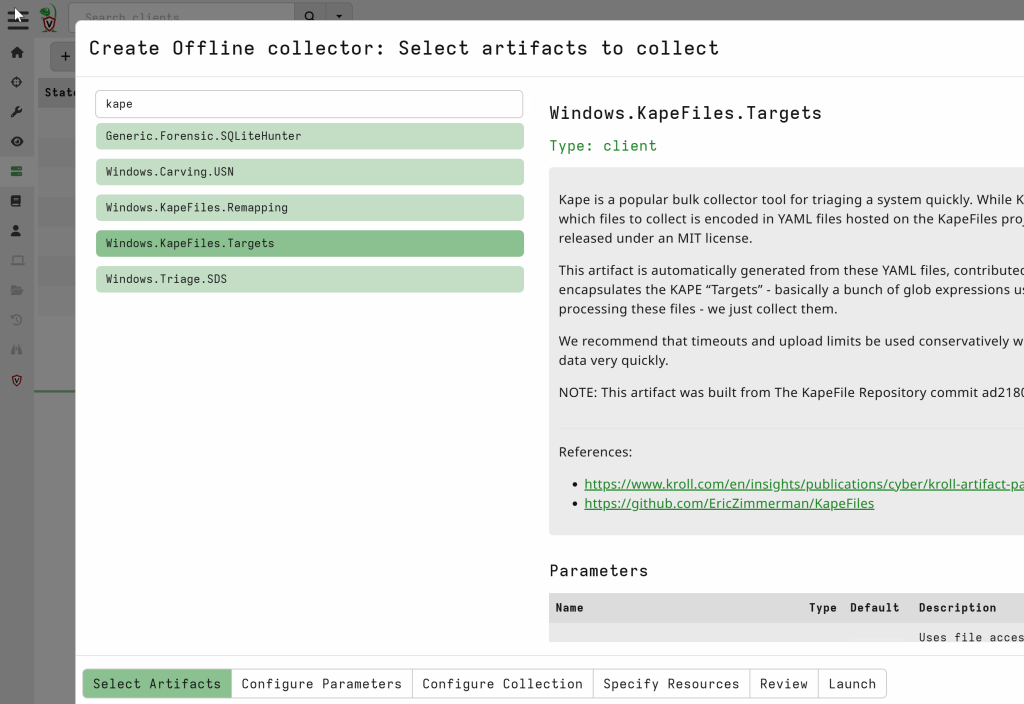
The next step is to prepare the Velociraptor binaries. You will create one Velociraptor client MSI for live forensics, an offline collector that outputs locally to an encrypted ZIP file, and another offline collector that uploads the resulting ZIP to Azure using your generated SAS URL. In your Velociraptor admin interface, go to “Server Artifacts” and select “Build Offline Collector”. Search for the artifact Windows.KapeFiles.Targets, open its configuration, and choose whichever collector profile you need, for example, _BasicCollection.
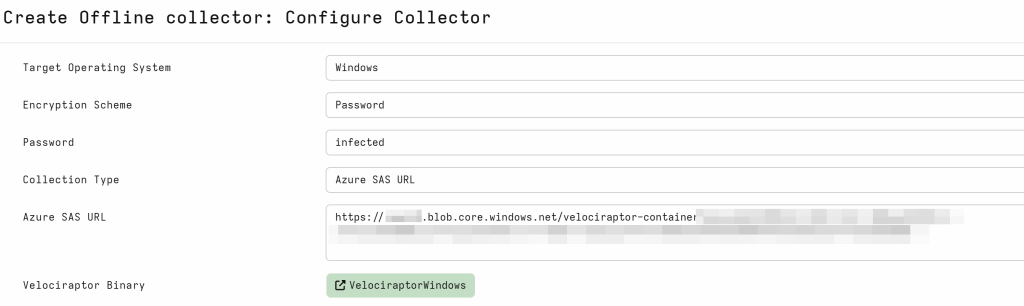
Select “Windows” for the target operating system, pick an encryption scheme such as password-based encryption (make sure the password is strong in production), and then, under Collection Type, choose “Azure SAS URL” if you want to upload directly to Azure. Paste the SAS URL you copied earlier, and also set the temporary and output directory to something predictable, such as C:\Program Files\CrowdStrike\Rtr\PutRun.
Note: Setting the output and temporary output directory is essential, as the resulting data will be stored inside %SYSTEM32% otherwise, as the CrowdStrike agent, which is the parent process when executing the Velociraptor executables later, runs from that location.
Provide a name for this collector, leave resource limits as defaults unless you need to change them, and click “Launch” to generate the executable. Download it and verify it works on a test machine, where it should upload the resulting collector data directly to the Azure storage container you set up.

Next, you can create another offline collector that does the same initial collection, except you choose “ZIP archive” instead of Azure. That way, you can run it offline and store the resulting encrypted ZIP locally. Finally, you can build the Velociraptor client MSI by returning to “Server Artifacts,” clicking “New Collection,” and selecting the artifact Server.Utils.CreateMSI. After all these steps, you should have three Velociraptor executables: two offline collectors (one for Azure, one for local) and a client MSI.

In CrowdStrike Falcon, upload all these files by navigating to Host Setup and Management > Response Scripts and Files. Remember that you may want to prepare multiple offline collectors for different needs (for instance, _SANS_Triage or _KapeTriage, with or without memory acquisition). Having a collection of various offline collectors in Falcon’s script repository can be a huge time saver for responding to different threat scenarios.
Using CrowdStrike Real Time Response to Execute Velociraptor
With the files in place, you need to ensure your hosts are able to use Falcon put-and-run capabilities. In the Falcon console, go to Host Setup and Management > Response Policies > Windows, and check that put, run, and put-and-run are activated for the selected policy.

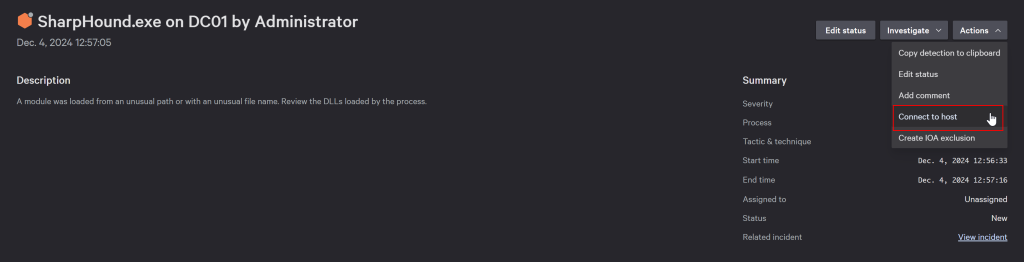
Next, go to Host Setup and Management > Host Management and locate the specific host to which you will respond. On the host details page, confirm that the policy assigned to it indeed allows put-and-run. Suppose you now detect an incident or an endpoint detection for that host. In that case, you can open Endpoint Security > Endpoint Detections, locate the detection, click the three dots, choose “Details view,” and then “Actions” to connect to the host.
Once connected, if your user has the Active Responder role, you can run put-and-run with the Velociraptor offline collector or MSI.
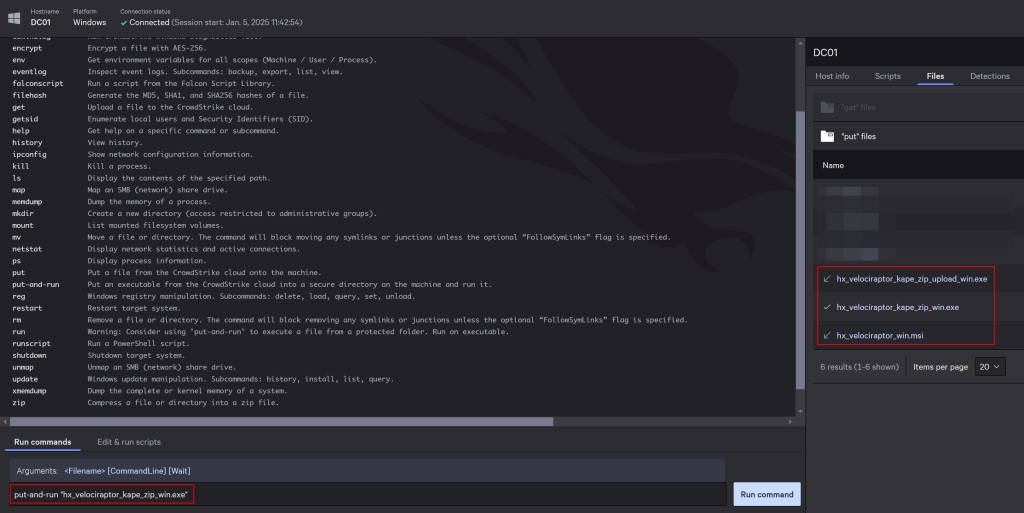
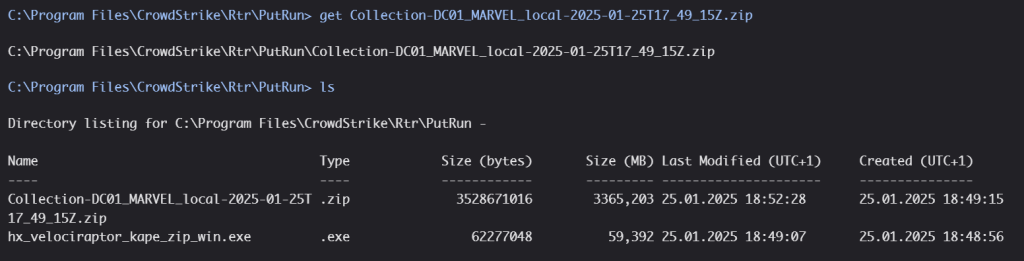
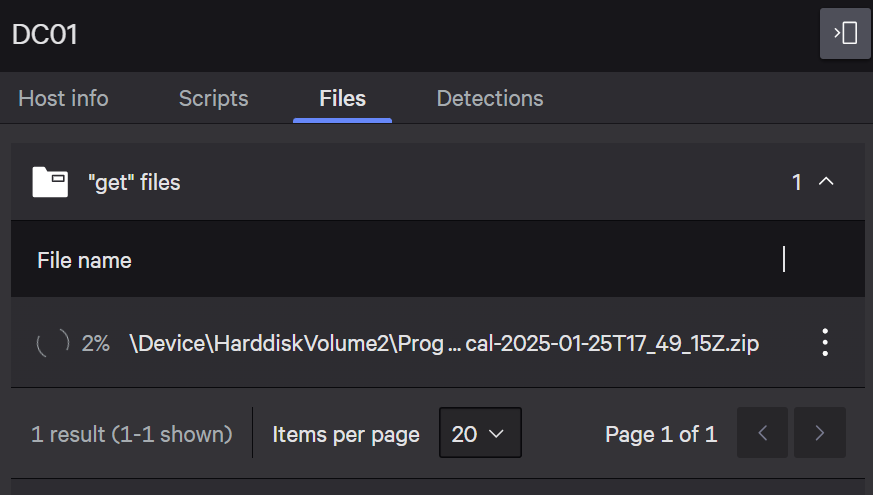
When the collector finishes, if you choose the local ZIP approach, the output will be in C:\Program Files\CrowdStrike\Rtr\PutRun, which you can retrieve with the get command. Depending on the size of the forensic artifact (~4GB in our case), it may take a very long time to upload from the endpoint to Falcon and then to download from Falcon to your workstation. That is why we prefer the Azure approach, because the collector can push its data directly to blob storage, eliminating the large intermediate transfers.
The file will then be available in the Falcon files tab. Alternatively, you could navigate to Audit logs > RTR in CrowdStrike and select the corresponding session. From there, you can select the files tab to see the upload progress. In our case, the whole upload took around 2 hours, which is everything but suitable for rapid incident response and triaging.
Although we could have used the basic collection instead and just collected fewer forensic artifacts, this is not an option in many cases. Especially if we have a case in which analysis of the physical memory is necessary, and our Velociraptor output is quickly bigger than 30 GB, the CrowdStrike upload is not a suitable option. Alternatively, if you plan to perform live host forensics, we could use our Velociraptor MSI instead and push it to the target system and run C:\Windows\System32\msiexec.exe /i "C:\Program Files\CrowdStrike\Rtr\PutRun\hx_velociraptor_win.msi". This installs the Velociraptor client service, which connects back to your Velociraptor server for continuous, live acquisition and investigation.
Note: Depending on your environment and policies, you may need to create an IOA exclusion in Falcon to prevent it from flagging Velociraptor’s actions as suspicious (for example, if it tries to read the ntds.dit file or SAM hive).
Uploading the Artifact Collection to Azure Using CrowdStrike
Suppose you use the previously created offline collector containing the Azure data storage SAS. In that case, the data will be uploaded to Azure instead of Falcon, which makes the whole execution way more straightforward and faster. We can continue working directly on the collection from our operator workstation.

Create a Velociraptor Offline Collection using Fusion SOAR on Critical Severity Detections
Finally, you can automate portion of these workflows by using Fusion SOAR. In CrowdStrike, go to Next-Gen SIEM > Workflows and create a new workflow from scratch. Choose Alert > EPP Detection as your trigger so that the workflow runs automatically whenever an EPP (Endpoint Protection) detection is raised. If you only want this workflow to run on high-severity detections, add a condition that checks for severity equals high. Then, add an action to “Get device details,” and add another condition to check if the platform is Windows. If that condition is met, add an action to “Put and run file,” selecting the sensor’s host ID as the device identifier, and choose one of your Velociraptor offline collectors. We recommend creating similar workflows specifically designed for Linux systems.

Optionally, you can add an email action to notify you that Velociraptor has been executed. This workflow approach means that whenever there is a high-severity detection on a Windows host, Velociraptor automatically gathers artifacts, either uploading them to Azure or storing them locally based on which offline collector you designated.
Summing Up
In this blog post, we explored how combining CrowdStrike Falcon with Velociraptor can significantly improve your incident response processes. By leveraging Falcon’s Real-Time Response alongside Velociraptor’s offline collectors and seamless Azure uploads, you can quickly gather and preserve critical evidence. We also showed how automating these steps through Fusion SOAR can boost efficiency and provide greater peace of mind during an engagement.
